[toc]
Introduction: SaaS vs Hosted
When companies think about getting their emails under their own domains, they often ask the same question: should we use an email service like Gmail (Google Apps for Business) or set up our own email server? There are pros and cons to both options, so let me try and sum them up.
Maintenance
When working with SaaS solutions, you outsource all the maintenance burden like spam-filtering, software updates, new feature developments, etc., to the service provider. This means that you do not need to keep an in-house system administrator to handle these tasks.
Typical maintenance list for a mail server consists of:
- Monitoring server space and health in general
- Monitoring email bounces and complaints
- Removing the server from blacklists if it gets into any
- Software updates
- User management
- Reviewing and updating spam-detection rules
Having your own server, however, gives you more flexibility:
- You can implement any feature without waiting for a 3rd party developer to do it for you
- Any new features, new mailboxes and domains, do not add anything to your monthly bill for the email server
- You have full access to the system, so in case of any issues you do not have a long feedback loop and do not need to fight your way through several levels of support to get your problem solved
Security and Privacy
When you store your emails on your own server you control, you know who reads them and when. You can rest assured that none of your emails are being scanned by crawlers for keywords to use in ad campaigns. Your information is available only to you.
When you entrusting your emails to a 3rd party company, you entrust them with basically all of your secrets. Even though the likelihood of a 3rd party company’s employee reading through your emails is small, your emails will, at the least, be scanned and crawled for keywords in order to server better-targeted ads.
End-user support
The tricky part of any email service is that more often than not the problem is actually located on the client’s computer. Any 3rd party support team at this point will let you deal with the problem on your own; supporting end-customers is not (and cannot be) their responsibility.
An in-house administrator, on the other hand, will be able to come over to an employee’s desk and solve the problem. This can potentially save you days of an employee’s time, compared to talking to the remote support team of a SaaS email service. (if they even have one; Gmail doesn’t).
Total Cost of Ownership (or, “TCO”)
When calculating the total cost of your email service, don’t think just about monthly costs per user.
Start with answering a few questions about the role of email in your company, such as:
Is it a business-critical service for you?
Some companies move away from emails to ticket and project management tools like Basecamp or JIRA, some move to messengers like Slack or Flowdock. In this case, email becomes nothing more but a bucket for notifications.
Will your business suffer any monetary losses if your email becomes unavailable for an hour?
What about a day? Two days? Try to roughly estimate the impact of such a situation.
Do you have a person who is technical enough to set up and maintain the email server and support workstations of your employees?
If yes – does that person have enough free time after his/her other routine tasks or will it be an overtime, extra duty?
Do you have a server available for hosting an email service or would you need to buy/rent one?
Add server rent/purchase costs, as well as utility bills (if applicable) to the equation.
Think about your employee profile.
Can you foresee who / how many team members are less technical and are likely to have questions and require support every now and then? This would add both direct costs in support administrator time and indirect costs in your employees being idle while their question is being answered and their problem solved.
***
All in all, TCO should reflect both your risks and your direct expenses split by month.
Take into account that monthly maintenance expenses on an on-premises email server after the initial setup are going to decrease as the solution will become stable and only occasional fine-tuning will be required. SaaS providers, in turn, will not ask for huge investments from the start, but the monthly fee will not go down over time either.
Create your AWS instance
For simplicity, this tutorial will assume that you are using Amazon Web Services (AWS) as the hosting platform for your email server. However, it’s possible to set up a similar mail server on any other dedicated server if you have full root access to it.
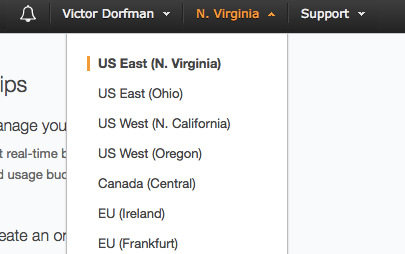
To create an AWS instance, log it to your AWS account and go to EC2 here: https://console.aws.amazon.com/ec2/v2/home
In the top-right corner, select a region. It is always wise to place the instance as close as possible to the user, so if the client is located on the East Coast, pick U.S. East (N.Virginia):
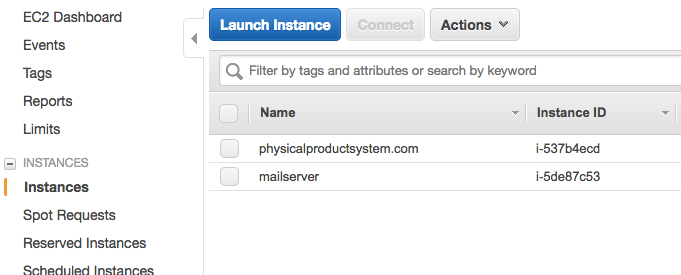
Next, go to Instances and click Launch Instance:
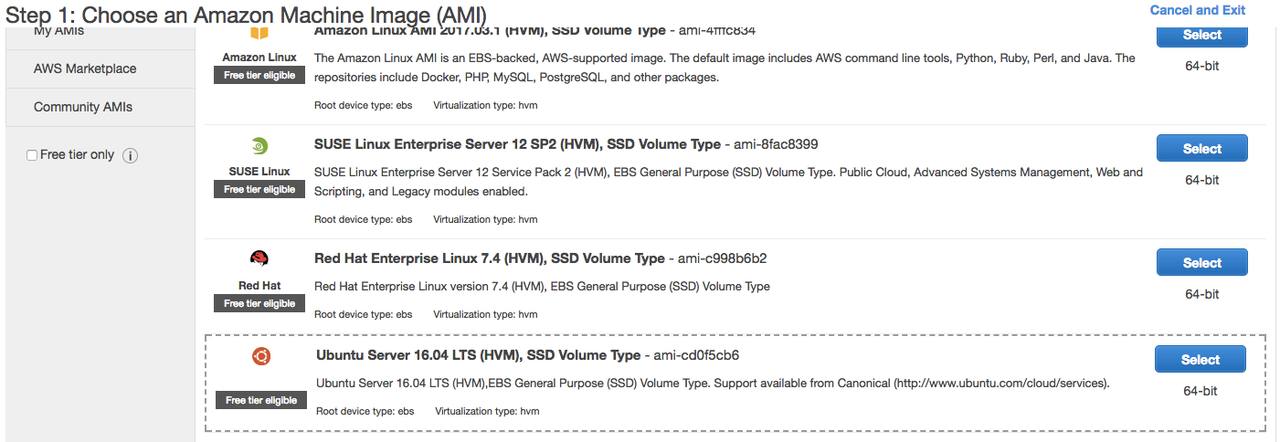
This will open a pop-up that will take you through instance creation process. Select Ubuntu 16.04 as the base image:
Instance type on the second screen – select t2.micro (should be selected by default):

Click Next: Configure Instance Details.
You do not need to change anything on the following screen, just click Next: Add Storage.
Here, change the primary partition size to 12GB:

Click Add New Volume and set it’s size to at least 50GB:

Click Next: Add Tags
Click Add Tag and put Key: Name, Value: your mail server URL:

This step is optional but helps a lot to improve maintainability of your AWS account.
Click Next: Configure Security Group
If you are using a new AWS account, you will need to configure a security group as seen on the screenshot:
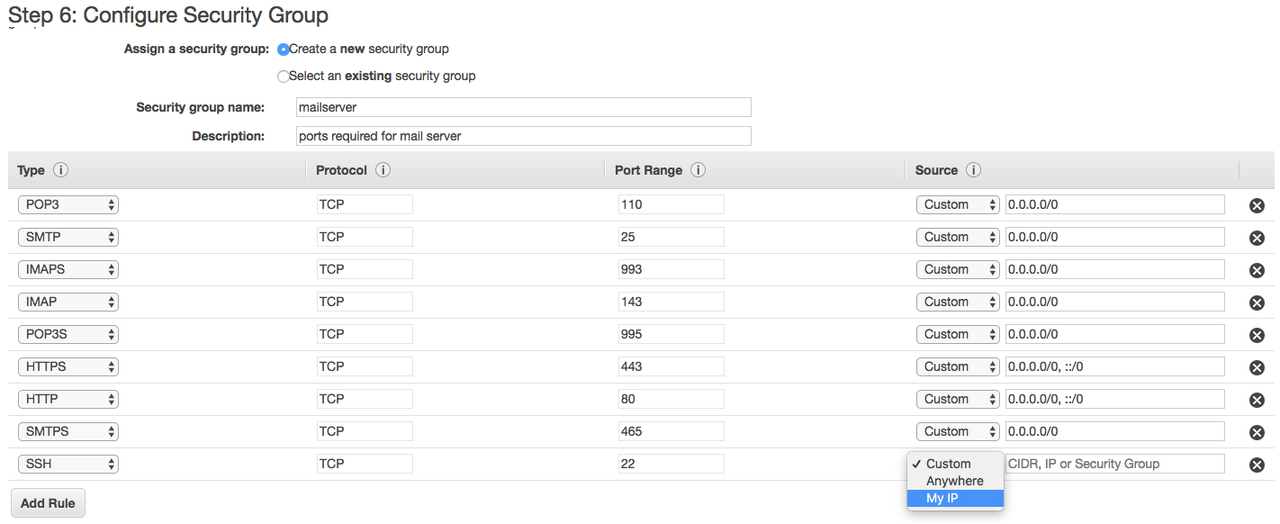
It will open the mail server to the world and will grant you (and only you) access to the server via SSH. If you will ever need to access the server from a different IP address, you will have to update the security group.
!!! NB: never leave SSH port open to the world (0.0.0.0/0) as it will lead to a major security breach!
In the Vic’s account security groups are already configured, so just use them. There are two security groups that must be attached to the instance:
Click Review and Launch.
On the next screen, click Launch.
In the following pop-up, select the existing private key if you have it or create a new one.
You will need this key to connect to the instance and configure the server.
Attach Elastic IP address
Go back to instance list: https://console.aws.amazon.com/ec2/v2/home?region=us-east-1#Instances:sort=instanceState
You will see your new instance there in “pending” state. Wait until it changes to “running” – it may take a couple of minutes.
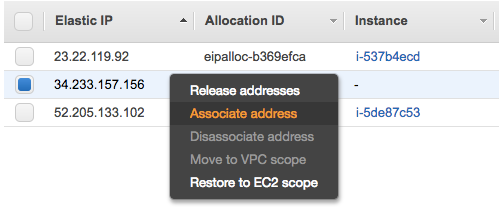
Once it is in “running” state, go to Elastic IPs section: https://console.aws.amazon.com/ec2/v2/home?region=us-east-1#Addresses:sort=PublicIp and click “Allocate new address” button.
In the following screen, make sure “VPC” is selected and click “Allocate”, then “Close”:

Next, right-click on the new IP address and choose “Associate address”:
Select your instance from the “Instance” drop-down and click “Associate”:
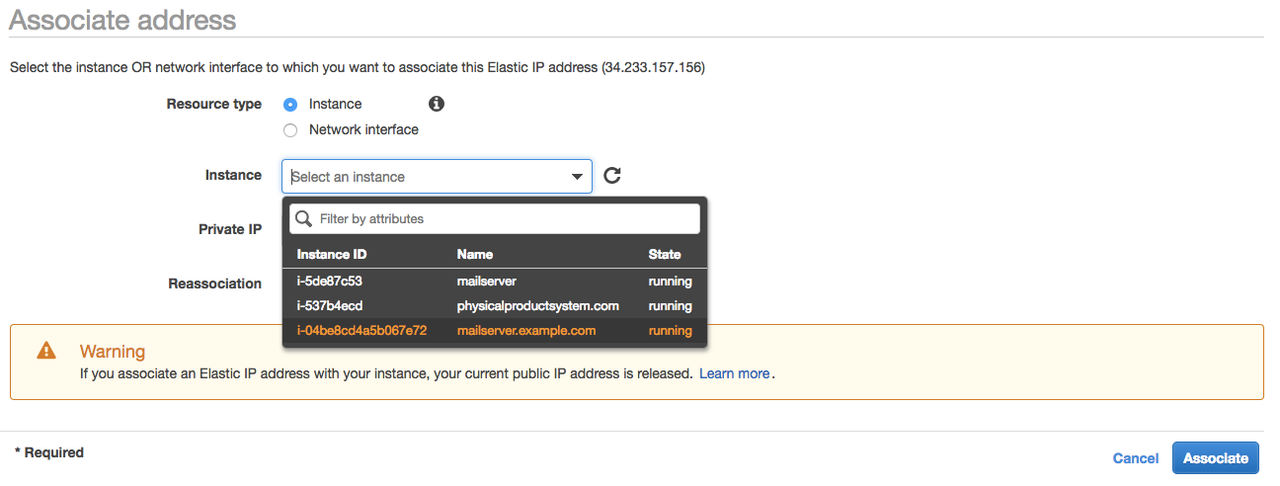
Now you are able to connect to your instance using this IP address and the IP will remain always associated with your instance. This IP address must be used for all mail-related DNS records as well.
Now you are ready to connect to your new Linux server! Use username “ubuntu” and the key you selected/generated during instance creation process, for example: ssh [email protected] -i viktors.pem
Create DNS records
To start, you will need to point the following records to your instance IP address (A records):
- mail.yourdomainname.com – this will be used by the mail server and mail clients to send/receive emails
- webmail.yourdomainname.com – this domain will be used for webmail interface (Roundcube)
- vim.yourdomainname.com – here we will host ViMbAdmin, which is responsible for accounts, aliases and groups management
Also, you will need to add an MX record:
yourdomain.com MX 0 mail.yourdomainname.com
Configure instance
Before setting up the mail server, there are a few steps you need to take to configure general server settings.
Configure partition
By default the second drive you created (50GB) will not be mounted and available – you need to create a partition and mount it first.
- Launch fdisk for the second drive
$ sudo fdisk /dev/xvdb
- Hit n to create new partition, then p for primary partition. Leave the rest default (Enter-Enter-Enter)
- Hit w to write changes to disk and exit
- Now that you have created a partition, it is time to create a filesystem on it:
$ sudo mkfs.ext4 /dev/xvdb1
- Create a mountpoint
$ sudo mkdir /var/vmail/
- Mount the partition:
$ sudo bash -c ‘echo “/dev/xvdb1 /var/vmail/ ext4 defaults 0 0” >> /etc/fstab’
$ sudo mount /var/vmail
$ sudo rm -rf /var/vmail/lost+found
Create swap file
EC2 instances do not have a swap file by default – let’s create one to improve system stability. This will create a 4GB swapfile in /var/swapfile and mount it:
$ sudo dd if=/dev/zero of=/var/swapfile bs=1M count=4096
$ sudo chmod 600 /var/swapfile
$ sudo mkswap /var/swapfile
$ sudo bash -c ‘echo “/var/swapfile /dev/null swap defaults 0 2” >> /etc/fstab’
$ sudo swapon -a
Install packages
- Update package information:
$ sudo apt-get update
- Install nginx and letsencrypt
$ sudo apt-get install nginx letsencrypt
Configure nginx
Create dhparam file:
$ sudo openssl dhparam -out /etc/nginx/dhparam.pem 2048
Replace contents of /etc/nginx/nginx.conf with the following: https://pastebin.com/iCddfxJC
And delete default vhost configuration file: /etc/nginx/sites-enabled/default
Lastly, restart nginx:
$ sudo service nginx restart
Configure letsencrypt
Letsencrypt allows us to obtain and renew a free fully-functional SSL certificate. Letsencrypt certificates have 3 months TTL so they must be renewed quite often.
Obtain SSL certificates
$ sudo letsencrypt certonly –webroot -w /tmp -d mail.yourdomainname.com
$ sudo letsencrypt certonly –webroot -w /tmp -d webmail.yourdomainname.com
$ sudo letsencrypt certonly –webroot -w /tmp -d vim.yourdomainname.com
Automatically renew certificates
To avoid any downtime and extra maintenance, add cron job to automatically renew certificates and reload all affected services:
$ sudo crontab -e
Add the following record to root’s crontab:
## This will renew all SSL certificates once a week and reload nginx, postfix and dovecot
0 3 * * 2 /usr/bin/letsencrypt renew; systemctl restart postfix; systemctl restart dovecot; systemctl reload nginx
Install and configure Postfix
Install packages
$ sudo apt-get install postfix postfix-mysql dovecot-core dovecot-imapd dovecot-pop3d dovecot-lmtpd dovecot-mysql mysql-server dovecot-sieve dovecot-managesieved
Depending on previously installed package list, you may or may not see prompts to configure mysql, postfix, etc.
You will be prompted to enter and confirm mysql root password. Use password generator to create a safe 16+ character password and note it down.
Next, you will need to choose Postfix configuration type. Select “Internet site”.
The next prompt will ask for the correct mail name. Enter the domain name you are configuring the mail server for.
Create a mysql database and user for vimbadmin
Log in to mysql using:
$ mysql -uroot -p
And enter mysql root password when prompted.
Then, run the following SQL:
CREATE DATABASE ‘vimbadmin’;
GRANT ALL ON ‘vimbadmin’.* TO ‘vimbadmin’@’127.0.0.1’ IDENTIFIED BY ‘password’;
FLUSH PRIVILEGES;
Configure Postfix
Navigate to /etc/postfix and edit master.cf configuration file:
$ cd /etc/postfix
$ sudo nano master.cf
There, find and uncomment the following two lines:
submission inet n – – – – smtpd
smtps inet n – – – – smtpd
Next, open main.cf and add the following lines towards the end of the file. Don’t forget to update the paths for tls cert and key files!
# Change postfix TLS parameter to use dovecot
#smtpd_tls_session_cache_database = btree:${data_directory}/smtpd_scache
#smtp_tls_session_cache_database = btree:${data_directory}/smtp_scache
smtpd_tls_cert_file=/etc/letsencrypt/live/mail.yourdomain.com/fullchain.pem
smtpd_tls_key_file=/etc/letsencrypt/live/mail.yourdomain.com/privkey.pem
smtpd_use_tls=yes
#smtpd_tls_auth_only = yes
#Handle SMTP authentication using Dovecot
smtpd_sasl_type = dovecot
smtpd_sasl_path = private/auth
smtpd_sasl_auth_enable = yes
smtpd_recipient_restrictions =
permit_sasl_authenticated,
permit_mynetworks,
reject_unauth_destination
# other destination domains should be handled using virtual domains
mydestination = localhost
# using Dovecot’s LMTP for mail delivery and giving it path to store mail
virtual_transport = lmtp:unix:private/dovecot-lmtp
# virtual mailbox setups
virtual_uid_maps = static:5000
virtual_gid_maps = static:5000
virtual_alias_maps = mysql:/etc/postfix/mysql/virtual_alias_maps.cf
virtual_mailbox_domains = mysql:/etc/postfix/mysql/virtual_domains_maps.cf
virtual_mailbox_maps = mysql:/etc/postfix/mysql/virtual_mailbox_maps.cf
Now, let’s create configuration to store all mailbox-related information in mysql:
$ sudo mkdir /etc/postfix/mysql
Create a file /etc/postfix/mysql/virtual_alias_maps.cf
$ sudo nano /etc/postfix/mysql/virtual_alias_maps.cf
And paste the following in it (don’t forget to put the correct mysql credentials in!):
user = user
password = password
hosts = 127.0.0.1
dbname = vimbadmin
query = SELECT goto FROM alias WHERE address = ‘%s’ AND active = ‘1’
Next, create /etc/postfix/mysql/virtual_domains_maps.cf
$ sudo nano /etc/postfix/mysql/virtual_domains_maps.cf
And paste the following:
user = user
password = password
hosts = 127.0.0.1
dbname = vimbadmin
query = SELECT domain FROM domain WHERE domain = ‘%s’ AND backupmx = ‘0’ AND active = ‘1’
Lastly, create /etc/postfix/mysql/virtual_mailbox_maps.cf
$ sudo nano /etc/postfix/mysql/virtual_mailbox_maps.cf
And paste the following:
user = user
password = password
hosts = 127.0.0.1
dbname = vimbadmin
query = SELECT maildir FROM mailbox WHERE username = ‘%s’ AND active = ‘1’
Dovecot configuration
Dovecot is an IMAP and POP server. It also implements security/authentication for IMAP/POP as well as SMTP (via Postfix).
Create Linux system user that will own all email in the system
$ sudo groupadd -g 5000 vmail
$ sudo useradd -g vmail -u 5000 vmail -d /var/vmail -m
Restart postfix
$ sudo service postfix restart
Enable required protocols
Edit /etc/dovecot/dovecot.conf
$ sudo nano /etc/dovecot/dovecot.conf
And enable required protocols (add the protocols = … line):
# Enable installed protocols
!include_try /usr/share/dovecot/protocols.d/*.protocol
protocols = imap pop3 lmtp sieve
Configure mail storage location
Edit /etc/dovecot/conf.d/10-mail.conf
$ sudo nano /etc/dovecot/conf.d/10-mail.conf
And set mail_location to:
mail_location = maildir:/var/vmail/%d/%n
Configure authentication
Edit /etc/dovecot/conf.d/10-auth.conf and make sure that the following options are set to:
disable_plaintext_auth = no
auth_mechanisms = plain login
Also comment out line: !include auth-system.conf.ext to disable system user authentication.
Add the following lines at the end of the file:
passdb {
driver = sql
args = /etc/dovecot/dovecot-sql.conf.ext
}
userdb {
driver = static
args = uid=5000 gid=5000 home=/var/vmail/%d/%n allow_all_users=yes
}
Configure mysql parameters in dovecot
Edit /etc/dovecot/dovecot-sql.conf.ext and paste the following at the bottom:
driver = mysql
connect = host=127.0.0.1 dbname=vimbadmin user=user password=password
password_query = \
SELECT username AS user, password, \
homedir AS userdb_home, uid AS userdb_uid, gid AS userdb_gid \
FROM mailbox WHERE username = ‘%u’
iterate_query = SELECT username AS user FROM mailbox
Change master config file
Edit /etc/dovecot/conf.d/10-master.conf and make sure it looks like this:
service lmtp {
unix_listener /var/spool/postfix/private/dovecot-lmtp {
mode = 0600
user = postfix
group = postfix
}
}
service auth {
unix_listener /var/spool/postfix/private/auth {
mode = 0666
user = postfix
group = postfix
}
unix_listener auth-userdb {
mode = 0600
user = vmail
}
user = dovecot
}
service auth-worker {
user = vmail
}
Configure Logging
Edit /etc/dovecot/conf.d/10-logging.conf and set
log_path = /var/log/dovecot.log
Restart Dovecot
$ sudo service dovecot restart
Install and configure ViMbAdmin
Install PHP and composer
For Ubuntu 16.04 default PHP version is 7.0.x:
Install packages
$ sudo apt-get install php7.0-fpm php7.0-mcrypt php-memcache php7.0-json php7.0-mysql php-gettext php7.0-zip
$ sudo curl -sS https://getcomposer.org/installer | php
$ sudo mv composer.phar /usr/local/bin/composer
Set time zone in PHP
Edit /etc/php/7.0/fpm/php.ini
$ sudo nano /etc/php/7.0/fpm/php.ini
And set timezone: date.timezone = UTC
Then, restart php:
$ sudo service php7.0-fpm restart
Install ViMbAdmin
$ cd /usr/local
$ sudo git clone git://github.com/opensolutions/ViMbAdmin.git vimbadmin
$ sudo git checkout 3.0.15
$ cd /usr/local/vimbadmin
$ sudo composer install
$ sudo chown -R www-data: /usr/local/vimbadmin
Edit vimbadmin config file
$ cd /usr/local/vimbadmin
$ sudo cp application/configs/application.ini.dist application/configs/application.ini
$ sudo nano application/configs/application.ini
And update the contents:
securitysalt = “superadmin-password” ← Generate super-secure password here
defaults.mailbox.uid = 5000
defaults.mailbox.gid = 5000
defaults.mailbox.homedir = “/var/vmail/”
resources.doctrine2.connection.options.driver = ‘pdo_mysql’
resources.doctrine2.connection.options.dbname = ‘vimbadmin’ ← Don’t forget to update this!
resources.doctrine2.connection.options.user = ‘vimbadmin’ ← Don’t forget to update this!
resources.doctrine2.connection.options.password = ‘password’ ← Don’t forget to update this!
resources.doctrine2.connection.options.host = ‘localhost’
Create mysql tables
$ cd /usr/local/vimbadmin
$ sudo mv public/.htaccess.dist .htaccess
$ sudo ./bin/doctrine2-cli.php orm:schema-tool:create
$ sudo chown -R www-data:www-data /usr/local/vimbadmin
Configure nginx
Create file /etc/nginx/sites-enabled/vma.yourdomain.com and paste the following:
server {
listen 443 ssl;
server_name vma.yourdomain.com;
ssl_certificate /etc/letsencrypt/live/vma.yourdomain.com/fullchain.pem;
ssl_certificate_key /etc/letsencrypt/live/vma.yourdomain.com/privkey.pem;
access_log /var/log/nginx/vma.yourdomain.com.access.log;
error_log /var/log/nginx/vma.yourdomain.com.error.log;
root /usr/local/vimbadmin/public;
index index.php;
location / {
try_files $uri $uri/ /index.php?$args;
}
location ~ \.php$ {
try_files $uri =404;
fastcgi_split_path_info ^(.+\.php)(/.+)$;
fastcgi_param SCRIPT_FILENAME $document_root$fastcgi_script_name;
include fastcgi_params;
fastcgi_pass unix:/var/run/php/php7.0-fpm.sock;
}
}
Install and configure RoundCube
RoundCube is webmail interface. Since email can be checked using any email client, this part is optional but recommended for convenience.
Install packages
$ sudo apt-get install roundcube roundcube-plugins roundcube-plugins-extra
Answer “Yes” to “Configure database for roundcube with dbconfig-common? ” prompt.
Configure nginx
Create /etc/nginx/sites-enabled/webmail.yourdomain.com and paste there the following:
server {
listen 443 ssl;
ssl_certificate /etc/letsencrypt/live/webmail.yourdomain.com/fullchain.pem;
ssl_certificate_key /etc/letsencrypt/live/webmail.yourdomain.com/privkey.pem;
server_name webmail.yourdomain.com;
access_log /var/log/nginx/webmail.yourdomain.com.access.log;
error_log /var/log/nginx/webmail.yourdomain.com.error.log;
root /usr/share/roundcube;
index index.php;
location / {
try_files $uri $uri/ /index.php?$args;
}
location ~ \.php$ {
try_files $uri =404;
fastcgi_split_path_info ^(.+\.php)(/.+)$;
fastcgi_param SCRIPT_FILENAME $document_root$fastcgi_script_name;
include fastcgi_params;
fastcgi_pass unix:/var/run/php/php7.0-fpm.sock;
}
}
Restart nginx:
$ sudo service nginx restart
Hi
I need help, im have problems with sudo bash -c ‘echo “/dev/xvdb1 /var/vmail/ ext4 defaults 0 0” >> /etc/fstab’
im getting a error: “/dev/xvdb1: ‘echo: command not found
what i have to do to fix that error.
thank you
Hey script kiddy, find another tutorial. This one is really confusing if you don’t have a good grasp of linux, and is also very much outdated. If you really want to use this, swap all of the ‘ with ” . This will get rid of the error, but might present other errors. Just use a different tutorial to setup your email server.
thank you for the help. do you have another tutorial that will be update?
says it right in the error ‘echo isnt a command.
If you want your own domain for free, I suggest getting a freenom 12 months@free domain, then following this tutorial:
https://simplyian.com/2015/01/07/Hacking-GMail-to-use-custom-domains-for-free/
are you sure that /etc/postfix/mail.cf sould be edited, because it doesn’t exist and it seems like you did a typo and meant main.cf
I can finish the tutorial but when I run the command
sudo ./bin/doctrine2-cli.php orm:schema-tool:create
I get “access denied” errors:
[DoctrineDBALExceptionConnectionException]
An exception occured in driver: SQLSTATE[HY000] [1045] Access denied for user ‘vimbadmin’@’localhost’ (using password: YES)
[DoctrineDBALDriverPDOException]
SQLSTATE[HY000] [1045] Access denied for user ‘vimbadmin’@’localhost’ (using password: YES)
[PDOException]
SQLSTATE[HY000] [1045] Access denied for user ‘vimbadmin’@’localhost’ (using password: YES)
I can login to MySQL directly using the vimbadmin user password I set in the application file, so I know that works. Any ideas?
Just ran into the same error…When editing the application/configs/application.ini file, the following line should NOT be:
resources . doctrine2 . connection . options . host=‘localhost’
Instead, it should be
resources . doctrine2 . connection . options . host=‘127.0.0.1’
Please don’t copy word for word! I had to throw in arbitrary spaces
Thanks David. While that change did not fix it for me, I did get it working. My mistake was copying and pasting the suggested config code near the top of the application.ini file, instead of editing the existing configuration which was lower in the file. So my config was getting overwritten by the defaults.
acutally have this error now:
nginx: [emerg] BIO_new_file(“/etc/letsencrypt/live/vma. (……) .com/fullchain.pem”) failed (SSL: error:02001002
Will these instructions work with a lightsail server?